Tuesday, December 9, 2008

Final Project: Done including RSS!!

My final project for this semester, "Property Names and Addresses", is now complete. Here is the link: http://onepotcooking.com/johnpennisten/final_project/

As indicated in my Nov 29 blog with the Information Architecture and three wirescreens, this project is basically a database "association table" application between real estate properties and their related entities such as owners, managing agents, lawyers, accountants and banks. Examples of the three screens are shown below, one screen for properties, one screen for associations and one for related entities. The three database tables - all populated with test data - are "properties", "relationships" and "entities" under "jpennisten" in PhpAdmin.

(1) In the file "entity.php" under "johnpennisten/final_project" in WinSCP there is a working example of a three-way join between database tables. Note that I had to use column aliases (keyword "AS") in the "select" statement since two of the database tables have similar column names such as "name", "addr_1", "city" etc.

(2) In the file "index.php" although there is only one "mysql_query" statement there are two possible "select" statements for it, depending on whether an RSS feed is requested or not. For a "normal" query we need a "LIMIT" clause since we only want to display two properties at a time, whereas for an RSS feed we want ALL properties. So there are two "select" statements, one built by concatenating the "LIMIT" clause to the other.

(3) Also in "index.php" note the use of the PHP "CEIL" function to prevent the last page to be displayed from being blank or truncated. We learned about the "CEIL" function in the "PHP/MySQL" course (X52.9367) which I took at NYU last summer.

(4) As for JavaScript, in the "entity" screen note the message in red "primary tax mail recipient" which sometimes appears and usually doesn't appear. In "entity_view.php" this message has its own "span" which in CSS has "display: none". But if the "mail" flag in the database table "relationships" is set to "Y" for this entity, then JavaScript changes "el.style.display" to "inline" for just this one screen element.

(5) JavaScript is also used (a) to highlight the primary tax mail recipient among the radio buttons in the "relationships" screen and (b) to extract and pass the property id# when the image is clicked = an "onclick" event observer - in the home "properties" screen.

(6) Radio buttons in the "relationships" screen are built using a PHP "foreach" statement on the output array from the prior database "select" statement.


Saturday, November 29, 2008

Final Project: Property Names & Addresses

In my daytime job with the New York City Department of Finance, we collect business and property taxes for the City. One of our biggest problems for Property taxes is to whom to send tax notices, whether it is the owner, managing agent, accountant, lawyer, bank (mortgage servicing organization) or other entity associated with over 1M commercial and residential properties in the five boroughs of New York City. Such "primary recipient" of tax notices for a given property frequently changes.

We currently have in DOF several solutions for these "name and address" problems, none of which works perfectly. One solution might be a new Web-based system for maintaining this extensive data of which this final project could serve as a simple prototype. Due to time constraints - there are only two weeks left in the semester - this project is inquiry-only; data entry and update capabilities would be added later. Due to time constraints this project also does not include login and signup screens similar to what I already did for the class7 and class9 assignments. But this project does include three database tables related by foreign keys, the MVC framework, simple pagination, session cookies, JavaScript ("onclick") and - time permitting - a simple RSS feed based on the RSS feed that I got working for class9.

This project has three screens - wireframes shown below - and three database tables. The three database tables are for Properties, Related Entities (owners etc) and Relationships between properties and their related entities. The Relationships table is an "assocation table" implementing the many-to-many relations between properties and related entities. For examples, a single property can have several owners and a given owner can own multiple properties.

The three screens below are first an initial list of properties from which to select via a JavaScript "onclick" event on the picture for the property. The next screen is a "list" screen of all the entities associated with that property. The entity currently designated as the primary recipient for that property is highlighted in red on this screen, based on a flag setting in the Relationships database table. A set of radio buttons on the left of the list screen allows the user to pick related entities one at a time for viewing on the third screen, which shows name, address and similar infomation for the selected entry. At the top of each screen is the image and description of the property originally selected on the first screen so that the user does not lose track of which property they are viewing.


DB many-to-many: use "association table"

In response to questions about implementing many-to-many relationships in a relational database, I have been working with DB2 mainframe databases for over 18 years. Many-to-many relationships frequently arise, for example students enrolled in a given course each semester. Any one student will have several courses in a semester and each course given in that semester will have several students enrolled in it.

The usual solution for these situations is to have what is generically called an "association table". Each row in the association table will have two foreign keys, one foreign key pointing to student# in a Students table and the other foreign key pointing to course# in a Courses table. The primary key for this Enrollments table would be the composite key of these two foreign keys. Each row in this Enrollments table would have separate columns for attributes (properties) such as seat number and final grade, which are different for each student in each course.

On the other hand, attributes such as room location or cell phone would belong either to the parent Students table or to the parents Courses table. For example, our Intensive Web Development is held in Room 202 of 48 Cooper Square whether anybody enrolls in the course or not. So room# belongs in the Courses table not the Enrollments table. My cell phone# is completely independent of whatever courses I take. So cell phone# belongs in the Students table not the Enrollments table.

Saturday, November 1, 2008

Client-Side Summary First Six Weeks

Here are links to each of my client-side assignments during the first six weeks of this semester. Images of each of these applications are shown directly in my previous blogs.

Class 1 Wireframe "Pet Shop"

Class 2 First XHTML/CSS layout

Class 3 "Personal Web Page"

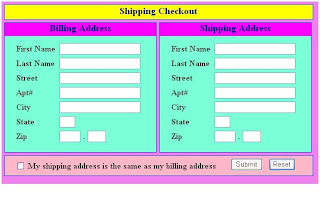
Class 4 "Shipping Address" JavaScript

Class 5/6 "E-Commerce" PHP & Event Observers

Class 6 - Assignment 1


Here is the image of last week's assignment, which was to add PHP and eliminate flickering to the assignment for week 5. I also added new picture elements to the web page.

Here is the link to the files in my folder in onepotcooking.com.


Friday, October 31, 2008

Class 2 - Assignment 1


Here is the image from assignment #1 in our second class this semester = our first XHTML/CSS layout.


This is the link to the file in my folder in onepotcooking.com.

Class 1 - Assignment 1


Here is my image of the first assignment in our first class several weeks ago = the wireframe diagram for the "Pet Shop" application.

The .ppt file in onepotcooking.com/johnpennisten is "Pet_Shop_Wireframe.ppt".

Monday, October 27, 2008

Class 5/6 flickering: a better way?

I went to the NYU Computer Lab in Room 210 at 48 Cooper Square today and blasted away for five hours straight at the "mouseover" flickering in assignment 5 but could never get it to go away cleanly in all situations. This was true even using Amos' "relatedTarget" approach in his email yesterday (Sunday!)

I puzzled over it on the subway home and at dinner. I came up with a new approach which I tried out tonight and which really works simply, cleanly and crisply. (Maybe we'll have Rice Krispies bars to celebrate at lunch this Saturday!) Unfortunately I'm now at the office using my grubby IE6 browser; the URL's for Mozilla Firefox are blocked on our computers. I'll be very busy the next few days at work but I'll try to get back to the lab soon to upload everything to onepotcooking. In any event, I have a vacation day on Friday when I can redo everything at NYU.

Meanwhile all the relevant code (html, css, js) is cut & pasted below. As for php, the nine thumbnails can be loaded via parameterized "includes", as we did in class on Saturday and which interested readers can already view under my id (johnpennisten) on onepotcooking.

The basic idea to stop the flickering is to have for each thumbnail one "outer" div which holds two "inner" divs, one for the thumbnail image and one for the thumbnail description. When the page first loads, the inner image div has "display: block" and the inner description div has "display: none". Event observers are set up on the OUTER thumbnail div for the mouseover and mouseout events. When you mouseover the OUTER thumbnail, the INNER image div is reset to display:none and the INNER description image is reset to display:block. When you mouseout, the reverse occurs. (display:inline can make things come up truncated.)

This way there is NEVER ANY REPOSTIONING OF ANYTHING; it's the repostioning that is likely the root cause of all this flickering business. Here is the code:

HTML ("tnail" is the outer div; "tnimg" and "tndat" are the inner divs):

div class="tnail" id="tn01"
div class="tnimg" id="tn01_img"
img title="image01" alt="thumbnail01" src="http://www.blogger.com/images/emandems.bmp" /div
div class="tndat" id="tn01_dat"
p strong use ems today! strong /p /div
/div

CSS:

".tnail { float: left; width: 125px; height: 90px; margin: 5px; padding: 0px; border: 0px;}"
".tnimg { display: block; background-color: aqua; width: 125px; height: 90px;}"
".tndat { display: none; background-color: white; width: 125px; height: 90px;}"

The ENTIRE javascript:

"// main event observer for window load"
"Event.observe(window, 'load', function() { setTnailMouseovers(); setTnailMouseouts(); });"

"// event observers for thumbnail mouseovers"
"function setTnailMouseovers() { var els = $$('.tnail'); els.each( function(el) { Event.observe(el, 'mouseover', function() { var tnimg = el.id + "_img"; var tndat = el.id + "_dat"; $(tnimg).setStyle({display:'none'}); $(tndat).setStyle({display:'block'}); }) })}"

"// event observers for thumbnail mouseouts"
"function setTnailMouseouts() { var els = $$('.tnail'); els.each( function(el) { Event.observe(el, 'mouseout', function() { var tnimg = el.id + "_img"; var tndat = el.id + "_dat"; $(tnimg).setStyle({display:'block'}); $(tndat).setStyle({display:'none'}); }) })}"

Friday, October 24, 2008

Class 5 - Assignment 1

Here is my solution for the Class 5 assignment with JavaScript. Especially helpful was Jack Pax's model solution using the "setStyle" method for screen elements.

Here is the link.

Wednesday, October 15, 2008

Class 4 - Assignment 1

I added a "Reset" button to my screen. This is a big help during testing. You type some data into the screen; it doesn't work right. You just clear the screen with "Reset" and promptly try again.

This is the link.

Thursday, October 9, 2008

Class 3 - Assignment 1

Here is my version of Class 3 - Assignment 1. Unfortunately I had to do it using IE6 on my office workstation, which doesn't have WinFTP or Mozilla Firefox because of office security policy. So it's not yet in onepotcooking.com and any IE7 kinks haven't been worked out. But SCPS has an open lab in Room 210 of 48 Cooper Square each Friday, so I'm going to try to get there tomorrow and see if I can upload it before Saturday class.

Meanwhile, Joel Linder did a really good job with his assignment. Following what he did really helped me, not least the logo in the upper left corner!! I haven't had a lot of html experience, so seeing what others have done is a big help.

Sunday, October 5, 2008

Google Reader > Netvibes

Google Reader is much better than Netvibes!!

I followed Amos' instructions in his Oct 02 blog. His instructions were easy, brief and worked perfectly. Everyone should switch as soon as they can.

Saturday, September 20, 2008